Closing reception tonight 7 - 8 pm.
For my UAS + 15 window exhibition. It has been a long haul trapped in the airless, hot little fishbowl of a window.
am a week away from finishing the production portion of this project and then I'll move into two weeks of post production. I sent the rough cut off to render last night and it is a beast, my After Effects ended up crashing.
March 21, 2013
March 15, 2013
Drawing Portraits Workshop
1 day drawing workshop with Martinho Correia at the Calgary School or Art.
This workshop will introduce students to the principles of portrait drawing in the realist tradition. Concepts to be covered include: measuring and proportion, planes and forms as well as values and shape design. The goal of the class is to give students an understanding of the traditional approach to creating an accurate and beautiful portrait.
The workshop began with an introduction to the Bargue drawing book and method. We were given a hand out to use as reference. Though there wasn't enough time to correctly make the drawing we got a start in on the method. Ususally a drawing like this can take about two weeks to finish.
Here is the start. I used a bamboo stick to get the relative size of elements starting from the plumb line down the center then finding the outer edges by using fractional measurements and their relationship to one another.
After the break we learned about the many elements that make up the head and face. We drew a head at a slight turn and began building this "realistic" face by relationships, not by referencing any actual person to give us a practical idea how the elements fit together in relation to one another. How the brow line in the top of the ear etc.
We blocked in more features as if they were basic solids onto the planes previously created. The mouth are as a shape that is similar to a half slice of an orange.
We added a bit of shading to accentuate the masses in the shapes on the planes of the face.
We used the muzzle shape and a starting point to create the protrusion of the lips on the face. This exercise helped teach how the shadows fall on the curving surface of the lips and how they sit.
We described more areas on the face with some directional shade lines.
More lines and shadows were added on our make believe practice head while we studied the finer points of its construction relative to some of the handouts we were given as reference. I like the eyeball in the upper right and how it describes how light and shadow fall on the iris.
I loved this reference image of how the muscles sit on the skull to create some of the movements of the face. Also note the workshop set up. Nice.
Martinho showed us some great exercises for drawing shapes off of old masters works in tracing paper. Then the aim is to try and replicate it exact by freehand. Every now and again putting the tracing paper over your drawing to see if you are accurate.
We used a transfer method to draw in a portrait to describe and break down the basic shapes of the face as well as challenged to draw in the models eye that as completely in shadow inthe reference photo.
Here I have built up the basic shadow. My eye placement seems off now that I look at it again days later. Damn. At any rate, i begin describing the planes by directional shading.
I blocked in the major planes of areas of light and dark. and described with line the simplified major planes of the face. We reached the end of the class and it was very inspiring if not a huge challenge in a short period of time but it gives me the gears to see differently and set forth on my continued path to improving my artistic practice. It feels like there is still such a long, long way to go.
This workshop will introduce students to the principles of portrait drawing in the realist tradition. Concepts to be covered include: measuring and proportion, planes and forms as well as values and shape design. The goal of the class is to give students an understanding of the traditional approach to creating an accurate and beautiful portrait.
The workshop began with an introduction to the Bargue drawing book and method. We were given a hand out to use as reference. Though there wasn't enough time to correctly make the drawing we got a start in on the method. Ususally a drawing like this can take about two weeks to finish.
Here is the start. I used a bamboo stick to get the relative size of elements starting from the plumb line down the center then finding the outer edges by using fractional measurements and their relationship to one another.
After the break we learned about the many elements that make up the head and face. We drew a head at a slight turn and began building this "realistic" face by relationships, not by referencing any actual person to give us a practical idea how the elements fit together in relation to one another. How the brow line in the top of the ear etc.
We blocked in more features as if they were basic solids onto the planes previously created. The mouth are as a shape that is similar to a half slice of an orange.
We added a bit of shading to accentuate the masses in the shapes on the planes of the face.
We used the muzzle shape and a starting point to create the protrusion of the lips on the face. This exercise helped teach how the shadows fall on the curving surface of the lips and how they sit.
We described more areas on the face with some directional shade lines.
More lines and shadows were added on our make believe practice head while we studied the finer points of its construction relative to some of the handouts we were given as reference. I like the eyeball in the upper right and how it describes how light and shadow fall on the iris.
I loved this reference image of how the muscles sit on the skull to create some of the movements of the face. Also note the workshop set up. Nice.
Martinho showed us some great exercises for drawing shapes off of old masters works in tracing paper. Then the aim is to try and replicate it exact by freehand. Every now and again putting the tracing paper over your drawing to see if you are accurate.
We used a transfer method to draw in a portrait to describe and break down the basic shapes of the face as well as challenged to draw in the models eye that as completely in shadow inthe reference photo.
Here I have built up the basic shadow. My eye placement seems off now that I look at it again days later. Damn. At any rate, i begin describing the planes by directional shading.
I blocked in the major planes of areas of light and dark. and described with line the simplified major planes of the face. We reached the end of the class and it was very inspiring if not a huge challenge in a short period of time but it gives me the gears to see differently and set forth on my continued path to improving my artistic practice. It feels like there is still such a long, long way to go.
March 13, 2013
how do you like them apples?
In my studio I created some apples out of styro-foam balls from the dollarama. I coated them in a base coat of red acrylic paint and pierced them with a toothpick.
In order for them not to get suck to a surface while they dried I invented another use for dried up rice cakes.

I painted a second layer once they dried in a rough textural way to add more depth and colour. I then applied yet more reds and topped them off with some red sparkles.
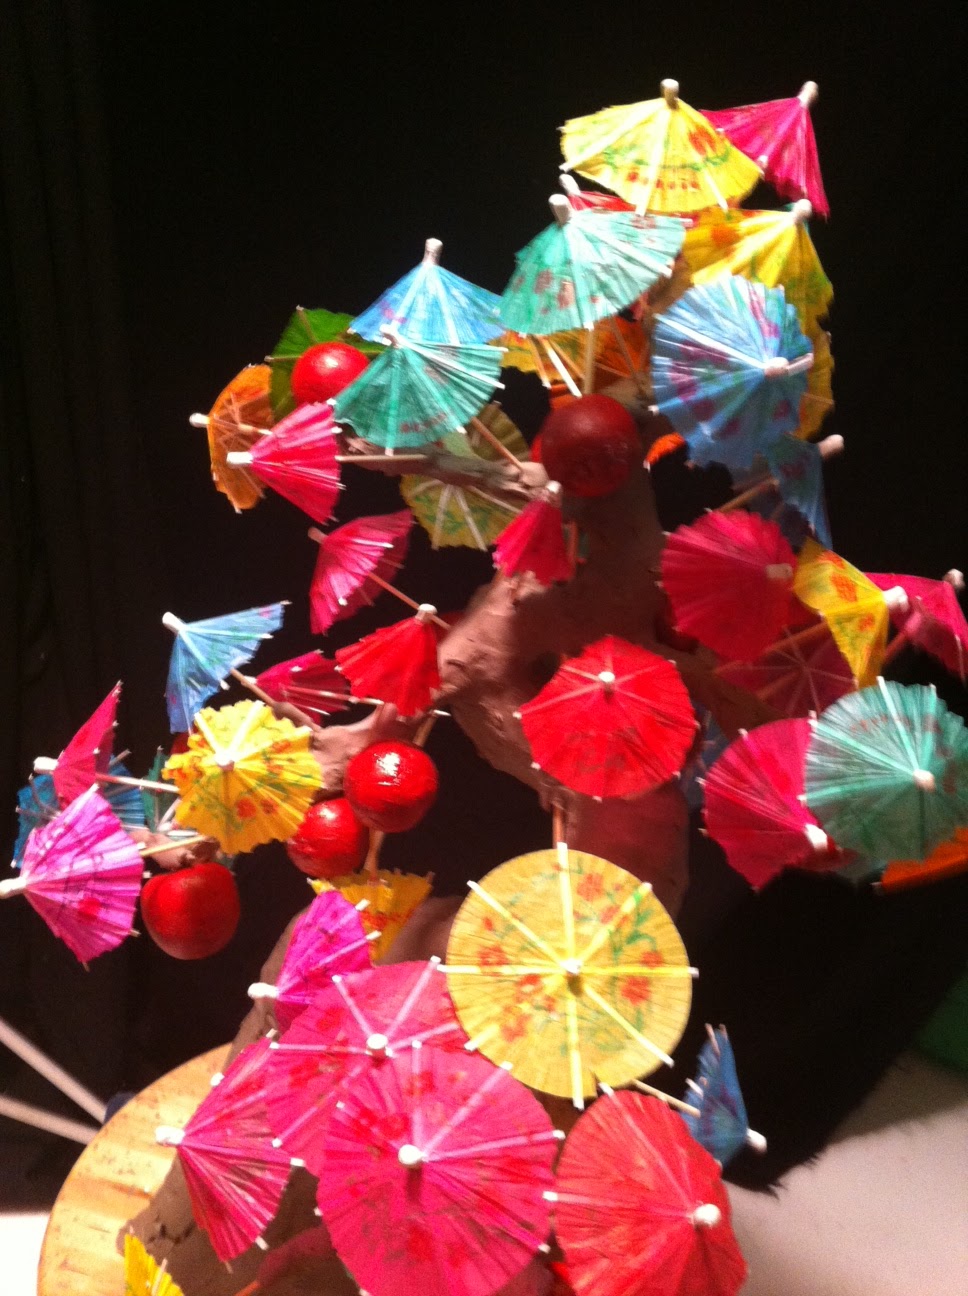
Here is the plasticine tree I built as an animation on the spinning lazy susan.
Here is the general set up once the lights had been turned back on and after all the leaves (tiny drink umbrellas) had blossomed.
You can see the twists and turns of the trunk. It got so hot in the studio space under the lights the plasticine got soft and the entire thing slumped.
You can see in this close up the delicious looking fruit amongst the colourful umbrella foliage.
You can see Lindsay Sorrel doing some wacky stuff outside my window space while I shoot this scene.
This is the tree after the shoot and after it slumped. I had to use many bamboo skewers both inside the structure and on the outside to have it stay up. I think it turned out really pretty.
The shot from outside my space before going home for the week-end.
In order for them not to get suck to a surface while they dried I invented another use for dried up rice cakes.
I painted a second layer once they dried in a rough textural way to add more depth and colour. I then applied yet more reds and topped them off with some red sparkles.
Here is the plasticine tree I built as an animation on the spinning lazy susan.
Here is the general set up once the lights had been turned back on and after all the leaves (tiny drink umbrellas) had blossomed.
You can see the twists and turns of the trunk. It got so hot in the studio space under the lights the plasticine got soft and the entire thing slumped.
You can see in this close up the delicious looking fruit amongst the colourful umbrella foliage.
You can see Lindsay Sorrel doing some wacky stuff outside my window space while I shoot this scene.
This is the tree after the shoot and after it slumped. I had to use many bamboo skewers both inside the structure and on the outside to have it stay up. I think it turned out really pretty.
The shot from outside my space before going home for the week-end.
Labels:
ANIMATION,
apples,
Calgary 2012,
CAOS,
installation,
residency,
Tree,
UAS +15 Gallery
March 1, 2013
Volcanic growth
Before we begin, a brief bit of inspiration.
http://www.geodesic-greenhouse-kits.com/
-----
I took my handy dandy lazy Susan and fount eh center. I plotted out radial lines to break the circle into sections. This way I can rotate as I take frames giving the appearance of a circular camera move when I add it to the composition. It is a lot more work but it seems easier than building a rig to move the camera and background in this case.
Here is the view from outside the space, looking in. The volcano grew in 300+ frames out of the plasticine I made at home. Recipe here: http://artistavision.blogspot.ca/2013/02/plasticine-recipe.html
Here is the comp of the volca with the chroma keyed out with the background and mist composited together.
http://www.geodesic-greenhouse-kits.com/
-----
I took my handy dandy lazy Susan and fount eh center. I plotted out radial lines to break the circle into sections. This way I can rotate as I take frames giving the appearance of a circular camera move when I add it to the composition. It is a lot more work but it seems easier than building a rig to move the camera and background in this case.
Here is the view from outside the space, looking in. The volcano grew in 300+ frames out of the plasticine I made at home. Recipe here: http://artistavision.blogspot.ca/2013/02/plasticine-recipe.html
Labels:
ANIMATION,
Calgary 2012,
CAOS,
geodesic,
greenhouse,
plasticine,
residency,
UAS +15 window Gallery,
volcano
February 28, 2013
That is what I was thinking...
This is Lindsay Sorrel, another artist working in one of the plus+15 windows during this CAOS project. I decided to update some of my website, I put a new cover image and a news item for the NUDE drawing show I am in this week-end. Brianbatista.com
I finished all the horse model shots so now he is in the last frame position and back in the window until the end of the month. We had to use a larger part of the day yesterday shooting some segments for the crowd sourcing project for matching funds on Calgary YYC. Visit and share this page: http://www.investyyc.com/projects/view/71
Inside my tiny space I set up this little area in front of the green screen to do the interview. The video will be posted on the above linked page. I did 50 other things from reporting and doing the paperwork necessary for this project to getting supplies and teaching canvas building and prep drawing to aboriginal youth as part of an after school program I am doing with USAY (Urban Society for Aboriginal Youth).
Far from burning out, I am excited to be starting in on an entirely new scenes this morning. Before I do, I can revel in the sheer amount of accomplishments I achieved yesterday while I warm up my creative engines.
Thanks for reading and following me on this journey.
I finished all the horse model shots so now he is in the last frame position and back in the window until the end of the month. We had to use a larger part of the day yesterday shooting some segments for the crowd sourcing project for matching funds on Calgary YYC. Visit and share this page: http://www.investyyc.com/projects/view/71
Inside my tiny space I set up this little area in front of the green screen to do the interview. The video will be posted on the above linked page. I did 50 other things from reporting and doing the paperwork necessary for this project to getting supplies and teaching canvas building and prep drawing to aboriginal youth as part of an after school program I am doing with USAY (Urban Society for Aboriginal Youth).
Far from burning out, I am excited to be starting in on an entirely new scenes this morning. Before I do, I can revel in the sheer amount of accomplishments I achieved yesterday while I warm up my creative engines.
Thanks for reading and following me on this journey.
February 27, 2013
Sneak peek - Toward Post production
You can get a sneak peek and even get a credit in my movie. Here's how....
Here is a quickly chroma keyed horse. I need to hand erase the posts in each and every frame then drop in my background effects, do editing and sound on my piece. If you read an earlier post you will have seen a bit of what I'm up to with backgrounds and special effects, this thing is going to be a monster in the edit suite. Come down and visit me in the UAS +15 Window Gallery and see how my stop-motion animation is made!
Click here to help!
More reason to support "In the Beginning...."
Calgary YYC will match funds we raise for the project, if you donate on our crown sourcing site you will not only help me to get my post production done, but you will also support three other great animation by 3 more artists.
Get your name as a credit for your support on my film here.
Do it now!
=:D
Click here to help!
More reason to support "In the Beginning...."
Calgary YYC will match funds we raise for the project, if you donate on our crown sourcing site you will not only help me to get my post production done, but you will also support three other great animation by 3 more artists.
Get your name as a credit for your support on my film here.
Do it now!
=:D
February 26, 2013
Its hot in here
......this tiny little space has no fresh moving air and it really heats up during my animation sessions.
Epcor centre for the Performing Arts - UAS +15 Window Space Gallery
Here is the powerbar I've had from my dad since I was a young boy. I had to rig an ingenious set up in this small space. I used an old Ikea curtain rod attached to the ceiling as a bar for the green screen and lighting, as well I have this power box and the cables tucked neatly away near the ceiling space.

Here is the hanging when I first got into the space. Lots has changed as I progress after the first month of production on this project. Almost at the half way point already.
Here you can see the horse I am working on in front of the green screen backdrop.
This moody pic I title: "Silence of the phant"
Here is a view from outside my fish bowl. The monitor in the middle shows a live feed from my laptop while I am working and shows my frame by frame process as well as the exposure sheet. I do this when the black curtain is closed and you cant see what is going on. I need the black curtain so that I don't get florescent light spilling in from the hallway compromising the image quality.
Epcor centre for the Performing Arts - UAS +15 Window Space Gallery
Here is the powerbar I've had from my dad since I was a young boy. I had to rig an ingenious set up in this small space. I used an old Ikea curtain rod attached to the ceiling as a bar for the green screen and lighting, as well I have this power box and the cables tucked neatly away near the ceiling space.

Here is the hanging when I first got into the space. Lots has changed as I progress after the first month of production on this project. Almost at the half way point already.
Here you can see the horse I am working on in front of the green screen backdrop.
This moody pic I title: "Silence of the phant"
Here is a view from outside my fish bowl. The monitor in the middle shows a live feed from my laptop while I am working and shows my frame by frame process as well as the exposure sheet. I do this when the black curtain is closed and you cant see what is going on. I need the black curtain so that I don't get florescent light spilling in from the hallway compromising the image quality.
Labels:
ANIMATION,
Calgary 2012,
CAOS,
EPCOR,
stop motion,
UAS +15 window Gallery
February 22, 2013
Shooting special effects
This was a fun but of experimentation.
If you can believe it I did this by squirting ink into a fish tank and then layering it in After Effects.
The devil is in the details. I layered it and darkened the blacks using curves. Then I added a luma key to drop out the black entirely. The ink was originally red and blue. I added a couple of keyframes using the change colour to effect to make it more dynamic. Near the end those effects are entirely playing with the light on set.
I borrowed and cleaned this cracked fish tank Ray had laying around. It needed a bit of love and a really good scrubbing. Then eventually I took multiple trips back and forth to the sink to fill it with super ice cold water and some bleach.
I made sure I had everything I needed close at hand. I set it up in front of the big black backdrop I previously painted. I put some buckets under the folding table to fortify it in case it collapsed under the weight of the water. I had extra towels ready since it leaks a bit. I set up my Canon DSLR to take HD video and got deeper than my elbows into the special effects photography.
To light particles in air or water you must have a hard light source coming from the rear. This is 3/4 cross lit from the back at a high angle. When I get my camera set up just right you cant tell it is a tank full of water. I'm not going to give away everything I shot or how it will be used yet until my project is further along. A guy's got to keep some mystery :)
Needless to say, I am very happy with how it turned out, it went better than I expected though it took a lot longer than I anticipated. This is the part that really slows down the process, filling and draining the big tank of water. I'm glad I selected the smaller tank. The bigger one would have taken forever to fill and drain. I still have to shoot another session with this set up in the next few weeks for some additional elements like smoke and fire. I cant wait.
The devil is in the details. I layered it and darkened the blacks using curves. Then I added a luma key to drop out the black entirely. The ink was originally red and blue. I added a couple of keyframes using the change colour to effect to make it more dynamic. Near the end those effects are entirely playing with the light on set.
I borrowed and cleaned this cracked fish tank Ray had laying around. It needed a bit of love and a really good scrubbing. Then eventually I took multiple trips back and forth to the sink to fill it with super ice cold water and some bleach.
I made sure I had everything I needed close at hand. I set it up in front of the big black backdrop I previously painted. I put some buckets under the folding table to fortify it in case it collapsed under the weight of the water. I had extra towels ready since it leaks a bit. I set up my Canon DSLR to take HD video and got deeper than my elbows into the special effects photography.
To light particles in air or water you must have a hard light source coming from the rear. This is 3/4 cross lit from the back at a high angle. When I get my camera set up just right you cant tell it is a tank full of water. I'm not going to give away everything I shot or how it will be used yet until my project is further along. A guy's got to keep some mystery :)
Needless to say, I am very happy with how it turned out, it went better than I expected though it took a lot longer than I anticipated. This is the part that really slows down the process, filling and draining the big tank of water. I'm glad I selected the smaller tank. The bigger one would have taken forever to fill and drain. I still have to shoot another session with this set up in the next few weeks for some additional elements like smoke and fire. I cant wait.
Labels:
ANIMATION,
Calgary 2012,
canon,
CAOS,
fish tank,
photography,
special effects,
Studio
February 20, 2013
Testing my lenses
I wanted to get a sense of what the three lenses I currently have form my Canon T3i are capable of. My T3i DSLR does not use a "full frame" sensor. That means I have some
cropping or what they refer to as a multiplier. I think its about
1.5.This means my 50 mm. lens will behave on this camera body more like a
75mm lens on a full sized sensor camera.
---
I wanted to get a sense of focal length and cropping on the composition. I left the camera on the tripod in a fixed position. I focused on a piece of paper hung in the same position in each shot to see how each lens with different focal lengths focuses. I set up my camera on the very busy side wall of the class room at Quickdraw Animation Society.
We will start with my zoom lens that came with the camera when I bought it. It is an 18-55mm lens. This is zoomed out at the furthest out setting (Z 18) in order to see what the largest field of view is. There is a bit of blurring at both front and back objects.
Next, I zoom in with the 18-55 mm. (Z 35) to create a medium shot with this lens. The background is more blurred and seems truncated in space.
Here is the 18-55 mm. (Z 55) zoomed in all the way. The frame is a fraction of what it was when it was zoomed out.
My 50mm. lens is my prime. It has a fixed focal length and does not zoom.It is a similar framing size as the 18-55 mm allt he way zoomed in. However the depth of field blurring is far more pronounced. This is a better choice when I want to blow/blur out the background in a shot at this focal sdistance.
Finally the 40 mm. pancake lens. It has a much wider field of view. It is rather close to the 'medium shot" of the 18-55 mm but has a lot more blurring in the background.
---
I wanted to get a sense of focal length and cropping on the composition. I left the camera on the tripod in a fixed position. I focused on a piece of paper hung in the same position in each shot to see how each lens with different focal lengths focuses. I set up my camera on the very busy side wall of the class room at Quickdraw Animation Society.
We will start with my zoom lens that came with the camera when I bought it. It is an 18-55mm lens. This is zoomed out at the furthest out setting (Z 18) in order to see what the largest field of view is. There is a bit of blurring at both front and back objects.
Next, I zoom in with the 18-55 mm. (Z 35) to create a medium shot with this lens. The background is more blurred and seems truncated in space.
Here is the 18-55 mm. (Z 55) zoomed in all the way. The frame is a fraction of what it was when it was zoomed out.
My 50mm. lens is my prime. It has a fixed focal length and does not zoom.It is a similar framing size as the 18-55 mm allt he way zoomed in. However the depth of field blurring is far more pronounced. This is a better choice when I want to blow/blur out the background in a shot at this focal sdistance.
Finally the 40 mm. pancake lens. It has a much wider field of view. It is rather close to the 'medium shot" of the 18-55 mm but has a lot more blurring in the background.
Background prep for special effects
I spent my entire long week-end in the studio working on some new stuff. It was exciting to be trying this new technique out.
I rolled out some Canvas for the backdrop.
I stapled it tight to the wall and began painting it flat black.
I set up a table in front of the painted black drop to place a fish tank for some of the effects shots.
AT the far end of the canvas I shot the paint being applied to the surface. I set up time lapse photography on my computer and began having fun making a lot of drippy messiness. This is the end result of the messy process. On the screen it will look like a painting coming to life over a short period of time. I will use this as some texture on some of my layers.
I rolled out some Canvas for the backdrop.
I stapled it tight to the wall and began painting it flat black.
I set up a table in front of the painted black drop to place a fish tank for some of the effects shots.
AT the far end of the canvas I shot the paint being applied to the surface. I set up time lapse photography on my computer and began having fun making a lot of drippy messiness. This is the end result of the messy process. On the screen it will look like a painting coming to life over a short period of time. I will use this as some texture on some of my layers.
Labels:
ANIMATION,
Calgary 2012,
CAOS,
residency,
time lapse,
UAS +15 window Gallery
February 18, 2013
Slap some paint on it
I worked in my studio slapping some paint on some of the props I will be using in my animation residency project.
You may remember the elephant from a previous post, well he got his tusks, toe nails and eyes treated with silver leaf for starters.
I rubbed some black all over him and then covered him in copper again but much more loosely.
Once you pour the ammonia over the copper not much seems to happen, it just looks wet.
A minute later it starts to patina and looks like this.
This patina is very fragile and I learned through trial and error you cant really put a protective coating over it without jeopardizing the integrity of the material sadly. it has to be brittle to stay beautiful. Hopefully it doesn't degrade too much while shooting.
I also brought in the pair of mannequin hands for a pink palm treatment. They will get another coat and detailing soon enough.
I also used the same colour on the bottom of the foot.
And did a first coat on the nails. The paint wears off nicely through movement making them look aged and chipped, just the look I am usually after.
You may remember the elephant from a previous post, well he got his tusks, toe nails and eyes treated with silver leaf for starters.
I rubbed some black all over him and then covered him in copper again but much more loosely.
Once you pour the ammonia over the copper not much seems to happen, it just looks wet.
A minute later it starts to patina and looks like this.
This patina is very fragile and I learned through trial and error you cant really put a protective coating over it without jeopardizing the integrity of the material sadly. it has to be brittle to stay beautiful. Hopefully it doesn't degrade too much while shooting.
I also brought in the pair of mannequin hands for a pink palm treatment. They will get another coat and detailing soon enough.
I also used the same colour on the bottom of the foot.
And did a first coat on the nails. The paint wears off nicely through movement making them look aged and chipped, just the look I am usually after.
Labels:
ANIMATION,
Calgary 2012,
CAOS,
EPCOR,
paint,
patina,
residency,
UAS +15 window Gallery
Subscribe to:
Posts (Atom)