December 31, 2013

Moving on…..

What a way to start the new year with a bang than to totally change my studio situation. Time to move out and change things up in 2014.

I saw that CAAF advertised their residency program for the new year in the space I was subletting from them. They took a really long time to get back to me a confirm that indeed I was being kicked out but I bit the bullet and in an attempt to be the bigger person in the situation, strapped up my boots and used the majority of my Xmas vacation to vacate the property.
Having been the the space for two years, I  managed to utilize the space very well for cramming in all sorts of art supplies and project materials. Luckily as soon as I found out I had to move, Richard Reeves was in town visiting and Duncan had his van. That very evening they helped me move a big chunk of stuff to my house. One down!
So the situation seemed stressful. I have a lot going o and not to many nice days to do it over the holidays. I will however point to the brain ability to select and group things into patterns. In my case it doesn't have to do with the packing and organizing of stuff…….
It has to do with having a good friend willing to help and it just so happens to fall onto the most beautiful chinook days as well. I feel like one lucky "Bunny".
My neighbour Greg insisted on pulling out his trailer and helped me move all the large paintings and even the big red bean bag chair. While at my place unloading his girlfriend dropped by and helped him with a painting. He asked if he can hang it in his room. I said for sure. She got pissed and wouldn't let him take the piece because she said if she looked at it in his room it wouldn't turn her on. WTF?!, that chick is crazy!
He broke up with her then and there because he wasn't going to have anyone tell him what he can or can't hang on his wall. AS if this is a turn off, lol. He keeps telling me he loves the piece and sent me this pic from his phone.
On another day my best friend Ben helped me tackle all the loose ends remaining, the most annoying bits. It just so happened to be another chinook day and we were able to get wrapped up just in time as the final light left the sky and darkness and cold returned to Calgary.
Yesterday my room mate Ray helped me with the finishing touches. I had to move out the final stuff, patch and paint the walls and leave it better than I had been given, it's how I roll.
Here is the final view with the furniture CAAF first lent me with the studio as well as a few donations from myself. I am sad to let this wonderful space go but I am equally compelled to pass it on as an opportunity to another emerging artist, as it was integral to my development and success in the past years. My thanks and gratitude go out to CAAF for the wonderful opportunity subletting their space has afforded me. Now a new year begins, let's see where we go!

 = :D


December 16, 2013

The Hanged Man

The White Lodge Gallery held their annual Black x-mas show. This instalment Horror #4 show was this past week-end.  I created something to auction off, here are the steps.
Jim dropped off this slab of MDF to me to create an art work for the exhibition.
I gave it a good coating of black gesso to create a ground for painting.
I painted this reclining skeleton and attached his legs to a tree trunk. I rubbed in a bit of black on the bones to help create a little bit of texture.
I then painted in the background with copper paint. Ooooh shiny!
I then poured ammonia to patina the copper surface.
I then clear coated the piece to protect the surface and added in a bit of interference pigment to give it a bit more sparkle. After it dried I sanded the surface a bit.
I went in with black line and some white to put in some tarot card inspiration.
I went in with more black to help pop out the skeleton and gave it a textured clear coat on the surface.
And here it is hung for display at the gallery. I liked how it looks up side down. :D

December 13, 2013

Aboriginal Youth Animation Project week 3 & 4

Today is pay day, so we are wrapping up week 3 & 4 of the Aboriginal Youth Animation Project.
We began the week with our first group project where we created a metamorphosis film together.
We discussed the variety of possibilities with this technique as well as how to easily breakdown the phases of drawing. Each student does a drawing which metamorphoses into the next in a our ani-jam.
Here is the chart of the planned animation. Below I show the frames side by each so that the sense of time becomes tangible. Having 12 sheets of paper that are photographed for 2 exposures each really helps make the amount of drawing needed for animation a reality in physical space.
We then created our own field guides by drawing on acetate to use under our animations. This helps us all work to the same aspect ratio and size for our projects and to help line up the artwork under the camera. Guides cost too much t buy but are super easy and cheap to make.
I taught the first fundamental of animation which is the squash and stretch. I get the students to create cut out self portraits in which to experiments with the spacing and timing under the camera. Then they pair up and have head bounce battles with the various techniques they have learned to see what thee can make happen.
 The participants move on to creating a ball bounce using the proper planning technique, first drawing a trajectory then figuring out the spacing and the timing on one sheet. Later they will transfer the plan onto individual sheets and pencil test it. Following that they will correct the timing and anything else that isn't working. Afterward, they will have a solid plan and a tested example in which they can then turn it into a bouncing character animation.

On with the show.

December 3, 2013

Draw 'til you Drop V

Mark Vazquez-McKay put together another great drawing from life event for artists. I had to teach my final Drawing 1 class at ACAD on Saturday so, unfortunately, I couldn't do both days of the drawing event. However, It was still so worth spending the entire Sunday with the great group of people improving their skills and honing their craft. I am especially proud 3 of my past students joined in for the event. Their spirits are strong and I hope more can make it out and stand shoulder to shoulder with their peers in the future.
I am posting these Iphotos from the sketches I completed in my sketchbook and on one sheet of the new Mellotex paper I picked up from Swinton's (Thanks Doug and staff for introducing to me an exciting new product to experiment with). I did more drawings but didn't photo them yet but I will add them as soon as I do.
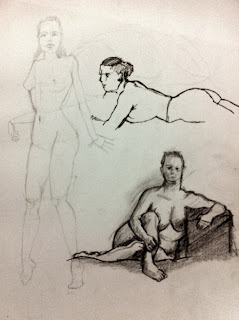
Quick poses as is the custom with an early start in the day to get the arm loosened up of the longer sessions. The one above top right was done in ink to get my hand ready because you can't erase the mistakes. Below that is one done in 6B. Thanks to Daisy Deville and her fantastic Burlesque models for working with us artists. It is great to mix subcultures to great benefit to both groups!
One of the rooms had a burlesque model who posed with attitude in a satyr costume. The other room had a great drawing opportunity but they were happening simultaneously and I unfortunately couldn't be in two places at once. Drat!  I went for horns and hooves since it is a lot more like my work. I am happy with how it turned out. However, by this put in the day I was tired, so I sat with my paper flat rather than standing so the work became contorted and out of proportion a bit which I find happens when you are making large work at an angle. I also experimented with some new blending materials on the new paper and had to rescue the face, though it does resemble the model. She said she really liked the piece to me after the session = :D
This is the final burlesque models pose for the final session of the event. Everybody was still going hard. The fatigue helps make more natural drawings I think and frees up the artist, thought it is a long road to take to get there lol.  If you'd like to join in the fun keep following this blog and I'll keep you posted about upcoming events like this.

Ciao for now  =:B

November 29, 2013

AYAP Week 1 & 2

I am now teaching full time in the days with my job as animation instructor for the Quickdraw Animation Society's Aboriginal Youth Animation Project.
Along side life skills and team building curriculum is my history of animation component. We covered a lot of content as well as made animation toys and watched a lot of movies. I took a few iPhone photos of my whiteboard notes to share with those of you who follow my blog :D
After a history of human communication slide show and lecture we move into the developments of the 1600's. I have the class make a Thaumatrope as their first animation toy assignment. I have to continually tell them to stay off the Facebook! (hence the drawing a participant did of me in the top corner of my whiteboard in the next picture)
The next thing they make is the infamous Phenakistoscope invented by Philip Plateau. This is where you have a disk with slots cut out and you face a mirror, spin the disk and peer thru the slots into the mirror and images on the disk appear to be moving. This eventually gets developed into the zoetrope and many other fantastic inventions.
We go thru the development of more animation related inventions and why they are important leading up to Edison's invention of motion pictures. We spend some time reviewing Muybridge's serial chronography and begin work making flip books, which I intend to later film for the final screening and possibly print to hand out as gifts. To the right in purple is an example of how to breakdown the stages needed to draw a blinking eye.
In another session I cover the Silent film era which includes the first animation ever made, the wonderful "Gertie the Dinosaur" by Winsor or McKay and some other hits along the way until we arrive at Disney and the first cartoon with synced sound. To the left in purple is the breakdown of artistic devices used by each film and how they pass down thru the generation. I encourage everybody to "know their history" and pay homage as we are all standing on the shoulders of greats who developed it.
I jump into my favourite era once sound is introduced and rubber hose arms. I discuss the ongoing competition between east and west coast animation and all the developments and great films it brings with it, including the ultimate demise of my favourite animating brothers the Fleischer's.  I show how Betty Boop starts out as a walk on character, and the fact that she is a dog, literally! I go from pre-cod to Disney's feature film triumph - Snow white and compare ti to what the Fleischer's are doing and how Superman eventually brings them down.
After colour is introduced we enjoy the Golden Age of animation and the massively awesome and huge amount of fantastic material produced. I do a little WW2 history lesson in there as cartoons go to war and show the first Astro boy, some UPA and a few cigarette ads featuring the Flintstones.  I segway into the commercialization of cartoons to sell products and weave my way to the first computer animated feature "Toy Story".  It has been busy since I work this job and teach some nights and most week-ends but I will also add the caveat that it is very fulfilling too.

This week-end I am teaching my final drawing class of the semester and hive the final critique followed by the life drawing event Draw 'til you Drop……….. and I just might!!!

November 28, 2013

Hanging show at DSW

The busy man that I am I offered to help a friend to hang artwork for the final show at the current Dancers Studio West location titled: Remembering Amelia.
So I got this room to work in, had to remove a bunch of stuff from the walls with a big heavy drill and yet I am not allowed to use any nails or screws or create any holes to hang the show. Lamesauce.
I managed to beat the odds and hang the stuff even with annoying onlookers judging me every step of the way. Thats why I like to work alone. Me and my level.
It ended up costing way more in materials than it should have because the great way we had discussed for me to do it wasn't allowed once I got there. So I had to run out and drop tons more money on more expensive industrial strength velcro so as to not put any holes in the wall. Geez. Once over this hump and after dropping $100 or so. I finally got the pieces up on the wall. Save people knocking them down etc. I wish I could have just gone with the original plan and done it in the time allotted. Pain in the ass, but now that it is all said and done it does look great.
One more in the main entrance hall way. A few days later I get a call asking me to hang up some more new banners from the ceiling. Did I mention the ceiling is very high and I'm freaked by heights. Plus, I'll have to go up scaffolding after being tired from working every day and night and I have to do it after my day job shift on my only night off.
Well I got over it pretty quick, and being a tiny bit frightened up by the ceiling definitely opened my fatigued eyes in fear of falling.
I'm actually really proud of the job, everything worked out and is on the level.
The final printed banners are hung and ready just in time for the performances.

Phew. He wipes the sweat off his brow. Another Batista success!


New and exciting news - HOTEL AWESOME!


I have been working full time in the day teaching animation for the Aboriginal Youth Animation project. I also teaching most evenings and week-ends. Obviously I am keeping really busy and can't get out much. In order to still have interesting interactions with people, I decided to bring the travellers to me! "Hotel Awesome" is listed on airbnb! Come stay with me:D

https://www.airbnb.ca/users/show/10315154


I had the director of the Melbourne animation Fest stay recently and he say's this:

"Firstly, a very belated huge THANK YOU for everything that you laid on when I swung through Calgary .... totally sensational experience all round."

I had two others stay since then and I'm awaiting their review on the new listing.

This week I have an Olympian from Nigeria staying with me this Sunday. Following that my next guest is the incredible animator Richard Reeves who will be staying at "Hotel Awesome" until December 15th. I am looking forward to it!

November 16, 2013

Shady dealings - Shape drawings

We create the world we see in terms of light and dark.

Today in my Drawing class, we are working on light and shadow using the shapes as reference.  As always, proper proportions are necessary as is the perspective from which you are viewing the objects you are drawing. So we begin by moving our desks closer to the lit objects in the centre of the room and prepping our drawing area for the task at hand.

Above is an example of the way light falls on objects and how we respond as artist with tone and shadow. The numbers represent the value range. We must keep in mind our value scale/ tone if the drawings are to describe the shape in space realistically.

For our purposes the optimal source of light is a single source of light where everything is illuminated by the same incident light. In our case we brought in a light source and turned out the rest of the lights in order to emulate the sun. This helps to eliminate the confusion that multiple light sources creates.
Begin by first drawing the shapes in their proper place and proportion. Determine the light and the dark tones then begin shading. The CORE shadow, which is the one on the object where the light is no longer hitting it, will be your darkest part ono the object. If the object has flat planes on the shape like a cube or pyramid, the shadows will be mainly toned equally throughout. Whereas when the shape is curved like a cone or cylinder or sphere the core shadow will be feathered as the light drops off as the surface curves.

Here is a drawn sphere with the terminology outlined in this class. It is important to keep in mind the difference between smooth and curvilinear and shapes as opposed to hard angles and surfaces which are much easier to shade.
You will notice that the cast shadows are not as crisp as they move away from the object. This is a lensing effect that must be properly drawn to make your artwork look realistic.  You can really see this emphasized in the above photo at the tip of the cone shadow at the bottom of the photo. Notice the shadow blurs out. The next thing to be mindful of is the reflected light that bounces back onto the surface. You can see here on this sphere how the left side is lighter in tone as it blends toward the core shadow. You want to have the transition be smooth when describing a smooth surface.


For reflected light to bounce back up onto a surface must be at an acute angle to that surface. IN this case the cone like pyramid shape (to the left) does not have reflected light hitting the flat area where the core shadow resides. The icosahedron object (to the right) has reflected light bouncing back up on its surface creating a lighter tone even though it is further away from the source of light and below the core shadow. If the shape like a cone or pyramid is sloping back away from the surface it is sitting on, there is no way fro the light to bounce up on it in order to create a reflected light in the shadow.
The surface must be more than perpendicular or overhanging the surface in which the reflected light is bouncing onto the object from.
Cash shadows cannot follow thru a core shadow. Instead they combine but do not increase in density.
When one objects cast shadow drapes across the core shadow of another object there should not be any criss cross lines and confusion. The pyramid to the far right cases a shadow over the cone object and where fit meets the core shadow they seamlessly blend together.

One good trick for seeing the values of the tons that I like to pass onto students is squinting. If you squint you will have a much easier time judging the many values int eh scene in which you are drawing. This also helps turn colours into values and to simplify the shapes that make up what you see.